How to resolve ORA-01157

I deleted Oracle table spaces for cleanup on my dev environment. After that, ORA-01157 error occurred in log file.

ERROR at line 1:
ORA-01157: cannot identify/lock data file 5 – see DBWR trace file
ORA-01110: data file 5: ‘/u01/app/oracle/oradata/TS/TS001.dbf’

Cause

This error is occurred when Oracle server can not see the data files on operating system. For example, the data file is deleted or file system is unmounted (if data file on NFS area). In my case, I deleted necessary data files by mistake.

How to fix

Step1 : Start on MOUNT mode

Shutdown and start an Instance and Mounting a Database.

SQL> shutdown immediate
SQL> startup mount;

ORACLE instance started.
Total System Global Area 1173240615 bytes
Fixed Size 8635922 bytes
Variable Size 373223054 bytes
Database Buffers 681671552 bytes
Redo Buffers 8120081 bytes
Database mounted.

MOUNT mode means that starting instance and mount a database without opening it. Please refer the following link for detail.
https://docs.oracle.com/cd/B28359_01/server.111/b28310/start001.htm#ADMIN11142

Step2 : Alter Database Datafile Offline Drop

Alter Database data file “offline drop”.
By this command, make it offline and mark as target of deletion.

SQL> alter database datafile ‘<datafile path>’ offline drop ;

ex) alter database datafile ‘/u01/app/oracle/oradata/TS/ts001.dbf’ offline drop ;

Step3 : Open database

SQL> alter database open;
Database altered.

Step4 : Delete table space

SQL> drop tablespace ‘<table space name>’ including contents;

ex) drop tablespace ts001 including contents;

After completing the above steps, restart database just in case.

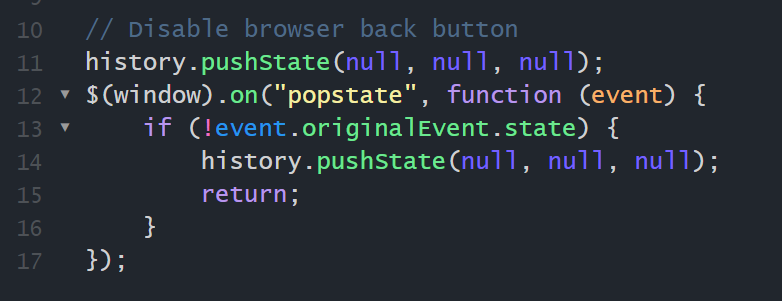
[JavaScript] How to disable Web browser back button.

The following link is sample source code to disable Web browser back button.
https://jsfiddle.net/saimjcf/we96kv4x/10/

Push “RUN” button, and JavaScript will be load.
Then push browser back button to check behavior. You can see browser back button does not work.

It works with the following code in sample source.

At first, push new history (=itself) to browser history. So, If push browser back button, back to itself.

#Checked only in Google Chrome and Firefox.

[WebSphere Application Server] How to disable security

If Security is enabled on WebSphere Application Server, there are some situation that you can not login to Admin Console as below.

  • Forget password
  • mistake security setting
  • Can not connect to LDAP server

You can disable security on WAS forcibly in the following steps.

Step1: Find security.xml

You can find the xml file which describes security setting in the following file path.
{WAS_install_directory}/profiles/{profile_name}/config/cells/{cell_name}/security.xml

Step2: Take a backup of security.xml

Please take a backup of security.xml before. Because IBM may not recommend to edit security.xml manually.

Step3: Edit security.xml

If security is enabled, you can find [enable=”true”] string as below. So please change it to [enabled=”false”] .

<security:Security xmi:version=”2.0″ xmlns:xmi=”http://www.omg.org/XMI&quot;
xmlns:orb.securityprotocol=”http://www.ibm.com/websphere/appserver/schemas/5.0/orb.securityprotocol…; xmlns:security=”http://www.ibm.com/websphere/appserver/schemas/5.0/security.xmi&quot; xmi:id=”Security_1″ useLocalSecurityServer=”true” useDomainQualifiedUserNames=”false” enabled=”true” cacheTimeout=”600″ issuePermissionWarning=”true” activeProtocol=”BOTH” enforceJava2Security=”false” enforceFineGrainedJCASecurity=”false” activeAuthMechanism=”SWAMAuthentication_1″ activeUserRegistry=”LocalOSUserRegistry” defaultSSLSettings=”SSLConfig_1″>
<authMechanisms xmi:type=”security:SWAMAuthentication” xmi:id=”SWAMAuthentication_1″ OID=”No OID for this mechanism” authContextImplClass=”com.ibm.ISecurityLocalObjectGSSUPImpl.WSSecurityContext” authConfig=”system.SWAM” simpleAuthConfig=”system.SWAM” authValidationConfig=”system.SWAM”/>

Step4: Restart WAS

You have to restart WebSphere Application Server to reflect a change. But you may not be able to restart normally, because ID and Password are required to stop WAS. So please kill the process of WAS.

Then security setting will be disabled and you can login to WAS Admin Console.

[Windows] How to access shared folder with another user (not login user)

In case of having multiple user accounts, if I want to access to the shared folder which login user does not have access right, it’s too much bother to once logout and login with another user having access right.

I have two user accounts (group company A and B) in my work.  Of course, the access right of each accounts is different. So, sometime I have to switch user and I thought it’s a bother.

The solution for this case is “net use” command that enabled to access shared folder with another user.

net use \\<hostname>\<shared folder path> password /user:<domain name>\username

After that , you can access the above shared folder with specified user account in the command. (For example, by using Explorer )

If you mistake setting or want to delete setting, please use the following command.

net use \\<hostname>\<shared folder path> /delete

How to use “tree” command to output folder hierarchy with all file name

“tree” command output folder hierarchy, but not include file name in folders as default, so add “/f” option.

STEP1: Open “Command Prompt(cmd.exe)”

STEP2:move to the folder you want to show with “tree” command.

cd <folder pass>

STEP3:execute “tree” command with “/f” option.

Execute “tree /f > tree.txt”.

  • /f:output file name
  • > tree.txt:write into text file(tree.txt).

JMeter via proxy server

I’m using JMeter for performance test.

In this article, I introduce how to use JMeter via proxy server. This method can be used if your  application can’t be accessed without proxy server. And,I think we can not access to internet without proxy server in many company.

FYI, Internet option settings is not applied to JMeter.

【Method 1】Start JMeter with JVM parameters

When execute “jmeter.bat” to start JMeter, add some JVM parameters to the command.

“-H” means proxy server hostname or IP address, and “-P” means port number.

This is the example. In the case of locate JMeter directly under C drive.

C:\apache-jemeter-2.9\bin>jmeter.bat -H <hostname or IP address> -P <port number>

FYI, there are other JVM parameters.

-H [proxy server hostname or ip address]
-P [proxy server port]
-N [nonproxy hosts] (e.g. *.apache.org|localhost)
-u [username for proxy authentication – if required]
-a [password for proxy authentication – if required]
Example : jmeter -H my.proxy.server -P 8000 -u username -a password -Nlocalhostt

【Method 2】Add JVM parameters to “jmeter.bat” directly

In “jemeter.bat”, the following command is written as default.

%JM_START% %JM_LAUNCH% %ARGS% %JVM_ARGS% -jar "%JMETER_BIN%ApacheJMeter.jar" %JMETER_CMD_LINE_ARGS%

Before edit “jemeter.bat”, make backup just in case.

Then, add hostname and port number to JVM parameters, as follows.

%JM_START% %JM_LAUNCH% %ARGS% %JVM_ARGS% -jar "%JMETER_BIN%ApacheJMeter.jar" %JMETER_CMD_LINE_ARGS% -H <proxy server hostname or IP address> -P <port number>

Auto login with Tera Term macro

I’m using Tera Term for login and work on a server. And, I feel it is annoying to login manually.

Tera Term has the macro functionality. So, it can login to server by only Double Click by some settings.

In this article, I introduce how to auto login by Tera Term macro.

【Step1】Associate with macro file(.ttl file)

The macro file extension is “.ttl”. So, to set file association to execute Tera Term macro(ttpmacro.exe)  by double click .ttl file.

The following the article is useful, please see.
https://www.lifewire.com/how-to-change-file-associations-in-windows-2624477

【Step2】Create macro file(.ttl file)

This is a sample .ttl file.

Change the following setting depending on your environment.

  • username:User name to login
  • password:User password
  • hostname:Server host name or IP address
  • logfilename:Log file name (entered command and output is written)
  • /auth:How to authenticate
  • logdir:Output folder of log fil
;================================================
; Teraterm auto login macro
;================================================
username = 'User name'
password = 'password'
hostname = 'Server host name or IP Address>'
logfilename = '<log file name>'
 
strconcat msg username
msg = hostname
strconcat msg ':22 /ssh /auth=password /user='
; 「/auth=」: set authentication type
; /auth=password: Password authentication
; /auth=publickey: Public key authentication
; /auth=challenge: Challenge-response authentication
; /auth=pageant: Using Pageant authentication
 
strconcat msg username
strconcat msg ' /passwd='
strconcat msg password
 
connect msg
 
; Output Teraterm log
logdir = 'C:\TeraTerm_logfiles\' ; Set log file directory
 
logfile = logdir
strconcat logfile logfilename
getdate datetime '-%Y%m%d-%H%M%S'
strconcat logfile datetime
strconcat logfile '.log'
logopen logfile 0 1

Create .ttl file, then double click to check login to server!!

…((((*ФωФ)ノ Go Go ♪